Showing posts with label creative coding. Show all posts

Sunday, March 9, 2014

The Human Triangulation Experiment, Stage 1

    Recently, us lucky saps in the Perceptual Computing Lab have been fortunate enough to be doing some prototypes for different external groups, and I've actually been lucky enough to work with one of my favorite groups, [REDACTED]!  Needless to say, I'm super excited, and one of the first projects I'm working on involves using depth data and object/user segmentation data to interact with virtual/digital content, much like the ever popular kinect/box2d experiments you've probably seen floating around...


Check out more of Stephen's stuff on github or on his website.

    Depth buffer, OpenCV, cinder::Triangulator, and Box2D, seemed pretty straightforward, I mean let's be honest, that's creative coding 101, right?  That's what I thought, but as usual, the devil's in the details, and after some (not terribly extensive) searching and a little bit more coding I had...eh, well...nothing.  My code looked correct, but no meshes were drawn that day, and even in a cursory inspection of my TriMesh2ds, there was nary a vertex to be seen.  Here's what I tried originally (this is sketch code, so yeah, the pattern is a little sloppy):

//cv contours are in mContours, mMeshes is vector<TriMesh2d>
for(auto vit=mContours.begin();vit!=mCountours.end();++vit)
{
  Shape2d cShape;
  vector<cv::Point> contour = *vit;
  auto pit=contour.begin();
  cShape.moveTo(pit->x,pit->y); ++pit;
  for(/* nothing to see here */;pit!=contour.end();++pit)
  {
    cShape.lineTo(pit->x, pit->y);
    cShape.moveTo(pit->x, pit->y);
  }
  cShape.close;
  Triangulator tris(cShape);
  mMeshes.push_back(tris.calcMesh());
}

    Right, so at this point, it should be a simple exercise in gl::draw()ing the contents of mMeshes, yeah?  Sadly, this method yields no trimesh for you!, and as I mentioned above, even a quick call to getNumVertices() revealed that there were, in fact, no vertices for you!, either.  The docs on Triangulator lead me to believe that you can just call the constructor with a Shape2d and you should be good to go, and a quick test reveals that constructing a Triangulator with other objects does in fact yield all the verts you could ever want, so methinks maybe it's an issue with the Shape2d implementation, or perhaps I'm building my Shape2d wrong.  I rule the latter out, though (well, not decisively), since Triangulator has the concept of invalid inputs, e.g. if you don't close() your Shape2d, the constructor throws, so...what to do, what to do?  To the SampleCave!


TRIANGULATE AGAIN, ONE YEAR! NEXT!

    Mike Bostock, he of d3.js fame gave a great talk at eyeo festival last year on the importance of good examples (Watch it on Vimeo), and you know, it's so true.  It's sorta like documentation, we employ technical writers for that sorta thing, I feel like we should at least give some folks a solid contract to put together good sample code for whatever we're foisting onto the world, rather than relegating samples to free time and interns (no offense to either free time or interns).  Now Cinder has amazing sample code, so a quick google search for TriMesh2d popped up the PolygonBoolean sample, which was basically doing what I wanted, i.e. constructing and drawing a TriMesh2d from a Shape2d...kinda.  I trust the good folks at Team Cinder to not ship sample code that doesn't work, so a quick build 'n' run later and I had a solution.  I was sooooo close...

//cv contours are in mContours, mMeshes is vector<TriMesh2d>
for(auto vit=mContours.begin();vit!=mCountours.end();++vit)
{
  PolyLine2f cShape;
  vector<cv::Point> contour = *vit;
  for(auto pit=contour.begin();pit!=contour.end();++pit)
  {
    cShape.push_back(fromOcv(*pit));
  }
  Triangulator tris(cShape);
  mMeshes.push_back(tris.calcMesh());
}

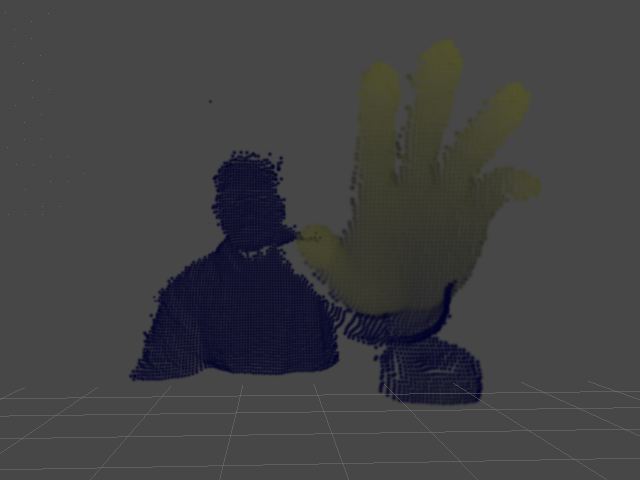
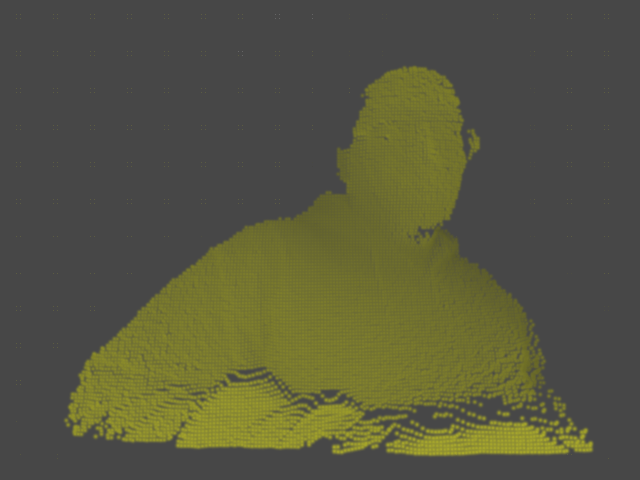
    The results?  Well, see for yourself:


My tribute to Harold Ramis, may you never end up in one of your own traps, sir.

    Next steps are to maybe run some reduction/smoothing on the contours, although I suppose it doesn't matter terribly for this prototype, and get it into Box2D, all of which I'll cover in Stage 2, including a quick 'n' dirty Cinder-based Box2D debug draw class.  This is awesome, it's total Tron stuff, bringing the real into the digital and all that sort of sorcery.  Once I get the Box2D stuff implemented, I'll stick a project up on github, until then, if you have specific questions, Tag The Inbox or leave a comment below, you are always welcome to try my Shogun Style...for reference, here's the complete update() and draw():

//Using Cinder-OpenCV and Intel Perceptual Computing SDK 2013
void segcvtestApp::update()
{
  mContours.clear();
  mMeshes.clear();
  if(mPXC.AcquireFrame(true))
  {
    PXCImage *rgbImg = mPXC.QueryImage(PXCImage::IMAGE_TYPE_COLOR);
    PXCImage *segImg = mPXC.QuerySegmentationImage();
    PXCImage::ImageData rgbData, segData;
    if(rgbImg->AcquireAccess(PXCImage::ACCESS_READ, &rgbData)>=PXC_STATUS_NO_ERROR)
    {
      mRGB=gl::Texture(rgbData.planes[0],GL_BGR,640,480);
      rgbImg->ReleaseAccess(&rgbData);
    }
    if(segImg->AcquireAccess(PXCImage::ACCESS_READ, &segData)>=PXC_STATUS_NO_ERROR)
    {
      mSeg=gl::Texture(segData.planes[0],GL_LUMINANCE,320,240);
      segImg->ReleaseAccess(&segData);
    }

    mSrcSurf = Surface(mSeg);
    ip::resize(mSrcSurf, &mDstSurf);
    mPXC.ReleaseFrame();
  }

  cv::Mat surfMat(toOcv(mDstSurf.getChannelRed()));
  cv::findContours(surfMat, mContours, CV_RETR_LIST, CV_CHAIN_APPROX_SIMPLE);

  for(auto vit=mContours.begin();vit!=mContours.end();++vit)
  {
    PolyLine2f cLine;
    vector<cv::Point> contour = *vit;

    for(auto pit=contour.begin();pit!=contour.end();++pit)
    {
      cLine.push_back(fromOcv(*pit));
    }

    Triangulator tris(cLine);
    mMeshes.push_back(tris.calcMesh());
  }
}

void segcvtestApp::draw()
{
  // draw camera feed
  gl::clear(Color( 0, 0, 0 ) );
  gl::color(Color::white());
  gl::draw(mRGB, Vec2f::zero());

  //draw meshes
  gl::enableWireframe();
  gl::color(Color(0,1,0));
  for(auto mit=mMeshes.begin();mit!=mMeshes.end();++mit)
  {
    gl::draw(*mit);
  }
  gl::disableWireframe();
}

Sunday, March 31, 2013

[TUTORIAL] Visualizing Depth in Unity, part 2

    The joys of having a laptop capable of development, I'm seriously in love with my Ultrabook.  This isn't just me shilling for the company, I'm totally sold on this thing.  Apple did right by forcing people to figure out how to build smaller, lighter laptops that still pack serious development punch.  For reference, I'm currently working off of a Gigabyte U2442, would be nice to get something that has a Core i7 CPU, but this one's a Core i5 at 3.1 with a mobile Geforce 6xx, so I'm happy with it.  Made it easy for me to bang out this second depth sample from the comfort of a...actually I think it was a bar as opposed to a coffee shop...


The Technolust, i sorta haz it...

    I mentioned in my last post I'd been messing around with some other methods for visualizing depth from the Creative Camera, I took a few moments after GDC to decompress and finish this one up, it sorta builds off the last sample.  Instead of visualizing a texture, I'm using the depth to set attributes on some particles to get that point cloudy effect that everyone seems to know and love.  This one's a bit more complex, mainly because I added a few parameters to tweak the visualization, but if you've got some Unity under your belt, none of this will be that tricky, and in fact, you'll probably see pretty quickly how setting particle data is very similar to setting pixel data.  I should also note that the technique presented here could apply to any sort of 3d camera, pretty much if you can get an array of depth values from your input device, you can make this work.  So here's what we're trying to accomplish when all's said and coded:


    Since this is a Unity project, we'll need to set up a scene first.  All that's required for this is a particle system, which you can create from the GameObject menu (GameObject > Create Other > Particle System).  Set the particle system's transforms (translate and rotate) to 0,0,0 and uncheck all the options except for Renderer.  Next, set the Main Camera's transform to 160,120,-240, and our scene is ready to go.  That all in place, we can get to coding.  We'll only need a single behavior for this test, which we'll put on the particle system.  I called mine PDepth, but you'll call it Delicious (or whatever else suits your fancy)!  First, let's set up our particle grid and visualization controls:

//We'll use these to control our particle system
public float MaxPointSize;
public int XRes, YRes;

private ParticleSystem.Particle[] points;
private int mXStep, mYStep;

  • MaxPointSize: This controls the size of our particles
  • XRes, YRes: These control the number of particles in our grid
  • points: This container holds our individual particle objects
  • mXStep, mYStep: These control the spacing between particles (this is calculated, not set manually)

    With those in place, we can populate our particle grid and get some stuff on screen.  Here's what our initial Start() and Update() methods should look like:

void Start()
{
    points = new ParticleSystem.Particle[XRes*YRes];
    mXStep = 320/XRes;
    mYStep = 240/YRes;

    int pid=0;
    for(int y=0;y<240;y+=mYStep)
    {
        for(int x=0;x<320;x+=mXStep)
        {
            points[pid].position = new Vector3(x,y,0);
            points[pid].color = Color.white;
            points[pid].size = MaxPointSize;
            ++pid;
        }
    }
}

void Update()
{
    particleSystem.SetParticles(points, points.Length);
}

    If you're wondering where the values 320 and 240 came from, we're making some assumptions about the size of our depth map to set the initial bounds.  Once we add in the actual depth query, we'll fix that and not have to rely on hardcodes.  Otherwise, if all went according to plan, we should have a pretty grid of white particles.  Be sure to set some values for XRes, YRes, and MaxPointSize in the Inspector!  For this example, I've used the following settings:
  • XRes: 160
  • YRes: 120
  • MaxPointSize: 5

    As I mentioned earlier, this procedure actually isn't too much different from the previous sample, in that we're building a block of data from the depth map then loading it into a container object, just in this case we're using an array of ParticleSystem.Particle objects instead of a Color array, and we're calling SetParticles() instead of SetPixels().  That in mind, you've probably already started figuring out how to integrate the code and concepts from the previous tutorial into this project, so let's go ahead and plow forward.  First, well need to add a few more members to our behaviour:

public float MaxPointSize;
public int XRes, YRes;
public float MaxSceneDepth, MaxWorldDepth;

private PXCUPipeline mSession;
private short[] mDepthBuffer;
private int[] mDepthSize;
private ParticleSystem.Particle[] points;
private int mXStep, mYStep;

  • MaxSceneDepth: The maximum Z-amount for particle positions
  • MaxWorldDepth: The maximum distance from the camera to search for depth points
  • mDepthBuffer: Intermediate container for depth values from the camera
  • mDepthSize: Depth map dimensions queried from the camera. We'll replace our hardcoded 320,240 with this

    The only major additions we need to make to our Start() method involve spinning up the camera and using some of that information to properly set up our particle system.  Our new Start() looks like this:

void Start()
{
    mDepthSize = new int[2];
    mSession = new PXCUPipeline();
    mSession.Init(PXCUPipeline.Mode.DEPTH_QVGA);
    mSession.QueryDepthMapSize(mDepthSize);
    mDepthBuffer = new short[mDepthSize[0]*mDepthSize[1]];

    points = new ParticleSystem.Particle[XRes*YRes];
    mXStep = mDepthSize[0]/XRes;
    mYStep = mDepthSize[1]/YRes;

    int pid=0;
    for(int y=0;y<mDepthSize[1];y+=mYStep)
    {
        for(int x=0;x<mDepthSize[0];x+=mXStep)
        {
            points[pid].position = new Vector3(x,y,0);
            points[pid].color = Color.white;
            points[pid].size = MaxPointSize;
            ++pid;
        }
    }
}

    The bulk of the changes are going to be in the Update() method.  The big difference between working with a particle cloud and a texture as in the previous example is that we need to know the x and y positions for each particle, thus the nested loops as opposed to a single loop for pixel data.  This makes the code a bit more verbose, but not a ton more difficult to grok, so let's take a stab at building a new Update() method:

void Update()
{
    if(mSession.AcquireFrame(false))
    {
        mSession.QueryDepthMap(mDepthBuffer);
        int pid=0;
        for(int dy=0;dy<mDepthSize[1];dy+=mYStep)
        {
            for(int dx=0;dx<mDepthSize[0];dx+=mXStep)
            {
                int didx = dy*mDepthSize[0]+dx;

                if((int)mDepthBuffer[didx]>=32000)
                {
                    points[pid].position = new Vector3(dx,mDepthSize[1]-dy,0);
                    points[pid].size = 0.1f;
                }
                else
                {
                    points[pid].position = new Vector3(dx, mDepthSize[1]-dy, lmap((float)mDepthBuffer[didx],0,MaxWorldDepth,0,MaxSceneDepth));
                    float cv = 1.0f-lmap((float)mDepthBuffer[didx],0,MaxWorldDepth,0.15f,1.0f);
                    points[pid].color = new Color(cv, cv, 0.15f);
                    points[pid].size = MaxPointSize;
                }
                ++pid;
            }
        }
        mSession.ReleaseFrame();
    }

    particleSystem.SetParticles(points, points.Length);
}

    So like I said, a bit more verbose, but hopefully not terribly difficult to understand.  A few things to be aware of:

int didx = dy*mDepthSize[0]+dx;

    We use the variable didx as an index into the depth buffer.  The reason we do this is because our particles don't correspond 1:1 to values in the depth buffer, so we use each particle's x and y position to do the depth buffer lookup.  In the next example, we'll take a look at how we can actually have a 1:1 depth buffer to particle setup using generic types.

if((int)mDepthBuffer[didx]>=32000)
{
...
}
else
{
...
}

    Here, the reason we test against a depth value of 32000 is because this is what the Perceptual Computing SDK uses as the error term.  So if the SDK can't resolve a depth value for a given pixel, it sends back 32000 or more.  In this case, if we find an error term, we make the particle really small, but in the next example, we'll look at how we can skip that particle altogether if we have an error value.  Finally, remember we need to implement some sort of range remapping function, I call mine lmap as a homage to Cinder's remap, but you can call it whatever, again, it's basically just:

float lmap(float v, float mn0, float mx0, float mn1, float mx1)
{
    return mn1+(v-mn0)*(mx1-mn1)/(mx0-mn0);
}

    So that's that, in the next sample, we'll look at some different ways to map the depth buffer to a particle cloud and use the PerC SDK's UV mapping feature to add some color from the RGB stream to the particles.  Until then, email me, follow me on Twitter, find me on facebook, or otherwise feel free to stalk me socially however you prefer.  Cheers!


What can i say, i love OpenNI...

Wednesday, March 27, 2013

[TUTORIAL] Depth maps and Ultrabooks

    Went to a really great hack-a-thon this past weekend at the Sacramento Hacker Lab to help coach some folks through working with the Perceptual Computing SDK and got to see some really cool work being done, everything from a next-generation theremin to a telepresence bot, all powered by the Creative 3D Camera and Perceptual Computing SDK.  Does me good to actually get out into the community and see people just dive right in and start building stuff.  Compound that with the GDC Dev Day that personally I think went amazingly well (standing room only at one point!) and it's been a good GDC for Perceptual Computing so far.  But now comes the really hard part, which is that PerC needs to not become a victim of its own success.  As the technology gets into more hands, now it becomes about not burning through goodwill by breaking features, being uncommunicative, or not keeping up with the ecosystem.  But I digress...

    Wanted to share a little Unity tip I got asked about a few times during the hack-a-thon, and that's how to visualize the depth map.  The SDK ships with a sample for visualizing the label map, and visualizing the color map is a fairly trivial change, but visualizing the depth map requires a little bit of doing.  It's actually pretty trivial from a working standpoint, so let's take a look at what's required.

    To get a depth map into a usable Texture2D, the basic flow is:
  • Grab the depth buffer into a short array
  • Walk the array of depth values and and remap them into 0-1 range
  • Store the remapped value in a Color array
  • Load the Color array into a Texture2D
    If that seems really simple, fear not, it actually is, so let's take a look at some code and see how we accomplish this.  Here's a really simple Unity behavior that populates the texture object from the depth map.  I'll leave assigning the texture as an exercise to the readers:

using UnityEngine;
using System.Collections;

public class Test : MonoBehaviour
{
    private PXCUPipeline mSession;
    private int[] mDepthSize;
    private short[] mDepthBuffer;
    private int mSize;

    private Texture2D mDepthMap;
    private Color[] mDepthPixels;

    void Start()
    {
        mDepthSize = new int[2];
        mSession = new PXCUPipeline();
        mSession.Init(PXCUPipeline.Mode.DEPTH_QVGA);
        mSession.QueryDepthMapSize(mDepthSize);
        mSize = mDepthSize[0]*mDepthSize[1];

        mDepthMap = new Texture2D(mDepthSize[0], mDepthSize[1], TextureFormat.ARGB32, false);
        mDepthBuffer = new short[mSize];
        mDepthPixels = new Color[mSize];
        for(int i=0;i<mSize;++i)
        {
            mDepthPixels[i] = Color.black;
        }
    }

    void Update()
    {
        if(mSession.AcquireFrame(false))
        {
            mSession.QueryDepthMap(mDepthBuffer);
            for(int i=0;i<mSize;++i)
            {
                float v = 1.0f-lmap((float)mDepthBuffer[i],0,1800.f,0,1.f);
                mDepthPixels[i] = new Color(v,v,v);
                mDepthMap.SetPixels(mDepthPixels);
                mDepthMap.Apply();
            }
            mSession.ReleaseFrame();
        }
    }

    float lmap(float val, float min0, float max0, float min1, float max1)
    {
        return min1 + (val-min0)*(max1-min1)/(max0-min0);
    }
}

    So like i said, fairly simple, albeit verbose technique, but should be fairly easy to wrap it up into a simple function for quick future use.  This same technique can also be used to visualize the IR map with some very minor tweaks.  I've actually been doing alot of stupid depth map tricks the last few days.  I'm at GDC all this week so I'm not sure how much dev time I'll get to be able to polish a few more of these up but maybe the weekend'll afford me some cycles if i'm not in full on crash out recovery mode...

Wednesday, January 30, 2013

[CODE] simple bullet physics debug draw for Cinder


    Not horribly hard to figure out but if you feel like saving yourself some code time or just looking for a quick jumping off point, here you go.  You can also grab the whole project from github.  If this looks like a straight port of bullet's GLDebugDrawer, it pretty much is.

.h
#include "cinder/app/AppBasic.h"
#include "cinder/gl/gl.h"
#include "cinder/Text.h"
#include "btBulletDynamicsCommon.h"
#include "LinearMath/btIDebugDraw.h"

using namespace ci;
using namespace ci::app;
using namespace std;

class CibtDebugDraw : public btIDebugDraw
{
    int m_debugMode;
public:
    CibtDebugDraw();
    virtual ~CibtDebugDraw();
    virtual void drawLine(const btVector3& from, const btVector3& to, const btVector3& fromColor, const btVector3& toColor);
    virtual void drawLine(const btVector3& from, const btVector3& to, const btVector3& color);
    virtual void drawSphere(const btVector3& p, btScalar radius, const btVector3& color);
    virtual void drawBox(const btVector3& bbMin, const btVector3& bbMax, const btVector3& color);
    virtual void drawContactPoint(const btVector3& PointOnB, const btVector3& normalOnB, btScalar distance, int lifeTime, const btVector3& color);
    virtual void reportErrorWarning(const char* warningString);
    virtual void draw3dText(const btVector3& location, const char* textString);
    virtual void setDebugMode(int debugMode);
    virtual int getDebugMode() const;
};

.cpp
CibtDebugDraw::CibtDebugDraw() : m_debugMode(0)
{
}

CibtDebugDraw::~CibtDebugDraw()
{
}

void CibtDebugDraw::drawLine(const btVector3& from, const btVector3& to, const btVector3& fromColor, const btVector3& toColor)
{
    gl::begin(GL_LINES);
    gl::color(Color(fromColor.getX(), fromColor.getY(),
        fromColor.getZ()));
    gl::vertex(from.getX(),from.getY(),from.getZ());
    gl::color(Color(toColor.getX(), toColor.getY(), toColor.getZ()));
    gl::vertex(to.getX(),to.getY(),to.getZ());
    gl::end();
}

void CibtDebugDraw::drawLine(const btVector3& from, const btVector3& to, const btVector3& color)
{
    drawLine(from,to,color,color);
}

void CibtDebugDraw::drawSphere(const btVector3& p, btScalar radius, const btVector3& color)
{
    gl::color(Color(color.getX(), color.getY(), color.getZ()));
    gl::drawSphere(Vec3f(p.getX(),p.getY(),p.getZ()), radius);
}

void CibtDebugDraw::drawBox(const btVector3& bbMin, const btVector3& bbMax, const btVector3& color)
{
    gl::color(Color(color.getX(), color.getY(), color.getZ()));
    gl::drawStrokedCube(AxisAlignedBox3f(
        Vec3f(bbMin.getX(),bbMin.getY(),bbMin.getZ()),
        Vec3f(bbMax.getX(),bbMax.getY(),bbMax.getZ())));
}

void CibtDebugDraw::drawContactPoint(const btVector3& PointOnB, const btVector3& normalOnB, btScalar distance, int lifeTime, const btVector3& color)
{
    Vec3f from(PointOnB.getX(), PointOnB.getY(), PointOnB.getZ());
    Vec3f to(normalOnB.getX(), normalOnB.getY(), normalOnB.getZ());
    to = from+to*1;

    gl::color(Color(color.getX(),color.getY(),color.getZ()));
    gl::begin(GL_LINES);
    gl::vertex(from);
    gl::vertex(to);
    gl::end();
}

void CibtDebugDraw::reportErrorWarning(const char* warningString)
{
    console() << warningString << std::endl;
}

void CibtDebugDraw::draw3dText(const btVector3& location, const char* textString)
{
    TextLayout textDraw;
    textDraw.clear(ColorA(0,0,0,0));
    textDraw.setColor(Color(1,1,1));
    textDraw.setFont(Font("Arial", 16));
    textDraw.addCenteredLine(textString);
    gl::draw(gl::Texture(textDraw.render()),
        Vec2f(location.getX(),location.getY()));
}

void CibtDebugDraw::setDebugMode(int debugMode)
{
    m_debugMode = debugMode;
}

int CibtDebugDraw::getDebugMode() const
{
    return m_debugMode;
}

Here's a quick shot of the debug drawer in action with a single body:

Sunday, January 27, 2013

[TUTORIAL] Getting tweets into Cinder


    Hmm...the notion of "getting something into Cinder" may be a bit of a misnomer, but then, you are pulling data into a framework/environment, so maybe it is.  Ah well, point being we're moving on from the previous installment wherein we walked through the steps required to build the twitcurl library so we could tweet in C++.  Now we need to actually use the darn thing, yeah?  So let's get to...err...Tweendering? (Cindweeting?  Cindereeting?  Sure, ok).  I'm assuming we all know how to use Tinderbox to setup a Cinder project, if not, just hit up <your cinder root>\tools\TinderBox.exe, it's pretty self-explanatory after that.    Here we gooo...

1.a) Once we've got an initial project tree, let's move some files and folders around to make setting up dependencies a bit simpler. Starting from <your cinder project root>, let's make our project tree look something like this (completely optional):

assets/
include/
  twitcurl.h
  oauthlib.h
  curl/
    (all the curl headers)
lib/ <-- add this folder manually
  libcurl.lib
  twitcurl.lib
resources/
src/
vc10/
  afont.ttf

Given this tree, setting up the rest of the dependencies for the project should be pretty straightforward.  I should point out that putting the font file directly into the vc10 folder is a bit of a hack and not at all the proper way to set up a Cinder resource, but for now I just want to get something functional.  Much respect to the Cinder team for their solution to cross-platform resource management though, I'll probably cover that once we start getting into building the final project.  Feel free to do some independent study, though, and check out the documentation on Assets & Resources in Cinder (and send me a pull request if you do!). 

1.b) So...let's code (and test out the new style sheet I wrote for syntax-highlighting)!  If you're interested in taking a peek at what the finished result might look like, check out the web version of Jer Thorp's tutorial, and if you're reading this Jer, no disrespect, I'm totally not meaning to steal your work for profit or some nefarious purpose, it's just a great, simple example that's super straightforward and easy to understand.  Had to get that off my chest, all credit where it's due.  If you haven't checked out the original tutorial, it goes (a little something) like this:

1) Do a twitter search for some term, we'll use "perceptualcomputing"
2) Split all the tweets up into individual words
3) Draw a word on screen every so often at a random location
4) Fade out a bit, rinse, repeat steps 3 and 4

1.c) Easy-peasy!  'Right, so first we need to get some credentials from twitter so we can access the API.  Not a hard process, just login to Twitter Developers, go to My Applications by hovering over your account icon on the upper-right, then click the Create a new application button, also on the upper-right.  Fill out all the info, then we'll need to grab a few values once the application page has been created.  The Consumer Key and Consumer Secret at the top of the page are the first two values we'll need, then we'll scroll down to the bottom of the page, click the Create Access Token button, and grab the Access Token and Access Token Secret values.  For now we'll just stick these in a text file somewhere for future reference.

1.d) Finally the moment we've all been waiting for, getting down with cpp (yeah you know m...ok, ok that's enough of that).  As with most C++ projects, we'll start with some includes and using directives:

#include <iostream>
#include "cinder/app/AppBasic.h"
#include "cinder/gl/gl.h"
#include "cinder/gl/TextureFont.h"
#include "cinder/Rand.h"
#include "cinder/Utilities.h"
#include "json/json.h"
#include "twitcurl.h"

using namespace ci;
using namespace ci::app;
using namespace std;

Outside of the normal Cinder includes, we'll be using Rand and TextureFont to draw our list of tweet words on screen, and we'll be using Utilities, twitcurl, and json to fetch, parse, and set up our twitter content for drawing.

1.e) Let's set up our app class next, should be no surprises here:

class TwitCurlTestApp : public AppBasic
{
public:
    //Optional for setting app size
    void prepareSettings(Settings* settings);

    void setup();
    void update();
    void draw();

    //We'll parse our twitter content into these
    vector<string> temp;
    vector<string> words;

    //For drawing our text
    gl::TextureFont::DrawOptions fontOpts;
    gl::TextureFontRef font;

    //One of dad's pet names for us
    twitCurl twit;
};

Ok, so I may have lied just a tiny bit.  If you're coming from the processing or openFrameworks lands, notice we need to do a little bit of setup before drawing text, but it's nothing daunting.  We'll see this a bit with Cinder as we get into more projects, there's a little more setup and it does require a little bit more C++ knowledge to grok completely, but it's nothing that should throw anyone with even just a little scripting experience.  That said, a little bit of C++ learnings can never hurt.

1.f) Time to implement functions!  If we're choosing to implement a prepareSettings() method, let's go ahead and clear that first.  For this tutorial, I'm going with a resolution of 1280x720, so:

void TwitCurlTestApp::prepareSettings(Settings* settings)
{
    settings->setWindowSize(1280, 720);
}

1.g) Onward!  Let's populate our setup() method now.  The first thing we'll want to do is setup our canvas and drawing resources, which means loading our font and setting some GL settings so our effect looks cool-ish:

gl::clear(Color(0, 0, 0));
gl::enableAlphaBlending(false);
font = gl::TextureFont::create(Font(loadFile("acmesa.TTF"), 16));

1.h) Now it's time to warm up the core, or I guess you could we could call it setting up our twitCurl object, so let's get out those Consumer and Access tokens and do something with them:

//Optional, i'm locked behind a corporate firewall, send help!
twit.setProxyServerIp(std::string("ip.ip.ip.ip"));
twit.setProxyServerPort(std::string("port"));

//Obviously we'll replace these strings
twit.getOAuth().setConsumerKey(std::string("Consumer Key"));
twit.getOAuth().setConsumerSecret(std::string("Consumer Secret"));
twit.getOAuth().setOAuthTokenKey(std::string("Token Key"));
twit.getOAuth().setOAuthTokenSecret(std::string("Token Secret"));

//We like Json, he's a cool guy, but we could've used XML too, FYI.
twit.setTwitterApiType(twitCurlTypes::eTwitCurlApiFormatJson);

Hopefully this all makes sense and goes over without a hitch.  Never a bad idea to scroll through everything and look for the telltale red squiggles, or if you're lazy like me, just hit the build button and wait for errors.


    Since we're only going to be polling twitter once in this demo, we'll do all of our twitter queries in the setup() method as well.  Let's take a look at the main block of code first, then we'll go through the major points:

if(twit.accountVerifyCredGet())
{
    twit.getLastWebResponse(resp);
    console() << resp << std::endl;
    if(twit.search(string("perceptualcomputing")))
    {
        twit.getLastWebResponse(resp);

        Json::Value root;
        Json::Reader json;
        bool parsed = json.parse(resp, root, false);

        if(!parsed)
        {
            console() << json.getFormattedErrorMessages() << endl;
        }
        else
        {
            const Json::Value results = root["results"];
            for(int i=0;i<results.size();++i)
            {
                temp.clear();
                const string content = results[i]["text"].asString();
                temp = split(content, ' ');
                words.insert(words.end(), temp.begin(), temp.end());
            }
        }
    }
}
else
{
    twit.getLastCurlError(resp);
    console() << resp << endl;
}

    This code should read pretty straightforward, there are really just a few ideas we need to be comfortable with to make sense of things:

1) Both Jsoncpp and twitcurl follow a similar paradigm (which pops up in a lot of places, truth be told) wherein we get a bool value back depending on the success or failure of the call.

2) The pattern for using twitcurl is a) make a twitter api call b) if successful, .getLastWebResponse(), if not .getLastCurlError().

3) There are a few different constructors for Json::Value, but for our purposes the default is sufficient.

4) Json members can be accessed with the .get() method or via the [] operator, es.g. jsonvalue.get("member",default), jsonvalue["member"].  I'm just using the [] operator, but either one seems to work.

That all in mind, let's walk through that last block a chunk at a time.

2.a) First, we need to make sure we can successfully connect to the twitter API, and here we see the twitcurl pattern in action.  .accountVerifyCredGet() "logs us in" and verifies our consumer and access keys, then returns some info about our account.  If all went according to plan (unlike the latest reincarnation), we should see the string representation of our jsonified twitter account info in the debug console:

if(twit.accountVerifyCredGet())
{
    twit.getLastWebResponse(resp);
    console() << resp << endl;

console() returns a reference to an output stream, provided for cross-platform friendliness.  Just think of it as Cinder's cout.

2.b) Now the fun stuff, let's get some usable data from twitter.  We'll do a quick twitter search, then get a json object from the result, provided everything goes well (from here on out, let's just assume that happens, if something goes horribly awry, email me and we'll work it out):

    if(twit.search(string("perceptualcomputing")))
    {
        twit.getLastWebResponse(resp);

        Json::Value root;
        Json::Reader json;
        bool parsed = json.parse(resp, root, false);

        if(!parsed)
        {
            console() << json.getFormattedErrorMessages() << endl;
        }

Hopefully nothing too hairy here, there's that twitcurl pattern again.  We do our search with our term of choice (note this could be a hashtag or an @name too), catch the result into a string, then call our json reader's parse() method.  The false argument for parse() just tells our reader to toss any comments it comes across while parsing the source string.  In this case, since we know what keys we're looking for, it's probably not a big deal, but if we were ever in a situation where we were going to have to query all the members to find something specific, having less noise might be a good thing.

2.c) Ok, since for the duration of this tutorial we're living in a perfect world, everything went according to plan, there were no oauth or parsing errors, and now we have a nice, pretty json egg ready to be cracked open and scrambled.  Let's get our tweets, split them up, and stash them in our string vector, then we'll be ready to make some art.

        else
        {
            const Json::Value results = root["results"];
            for(int i=0;i<results.size();++i)
            {
                temp.clear();
                const string content = results[i]["text"].asString();
                temp = split(content, ' ');
                words.insert(words.end(), temp.begin(), temp.end());
            }
        }
    }
}

Again, nothing crazy here, in fact I'm sorta starting to feel bad for making people read this since i'm not doing any crazy 3d, shadery, lighting, particle, meshy awesomeness, it's just simple parsing operations...Ah well, the sexy bullshit (as the good Josh Nimoy calls it) is coming, I promise.  One of the things to be aware of here is that Json::Value is really good about parsing data into the proper types for us.  As I mentioned earlier, the docs present a few different constructors, but we're not using any of those here.  Querying the "results" key (which contains all of our search results) gives us back a list we can iterate through in fairly simple order.  So all we do is parse that, then for every element in our array, we get its "text" key, which contains the actual body of a tweet.  Lastly, we take that text and use Cinder's built-in string splitter, which should be quite familiar to you if you've ever split a string in a different language.


    Looks like all we have left is to make some stuff happen on-screen, so same as we did with the setup() method, let's take a glance at the code first, then we'll break it down, although if you're already familiar with Cinder, there probably won't be anything new here...

void TwitCurlTestApp::draw()
{
    gl::color(0, 0, 0, 0.015f);
    gl::drawSolidRect(Rectf(0, 0, getWindowWidth(), getWindowHeight()));

    int numFrames = getElapsedFrames();
    if(numFrames%15==0)
    {
        if(words.size()>0)
        {
            int i = numFrames%words.size();

            gl::color(1, 1, 1, Rand::randFloat(0.25f, 0.75f));
            fontOpts.scale(randFloat(0.3f, 3.0f));
            font->drawString(words[i],
                Vec2f(Rand::randFloat(getWindowWidth()),
                    Rand::randFloat(getWindowHeight())),
                fontOpts );
        }
    }
}

3.a) No messing around, let's get right to it.  If you've ever done anything in processing, you're probably familiar with the technique we're implementing with these two lines of code to fade the foreground a bit between frames, i.e. set the fill color to black with some amount of transparency and draw a rectangle the size of the screen.

    gl::color(0, 0, 0, 0.015f);
    gl::drawSolidRect(Rectf(0, 0, getWindowWidth(), getWindowHeight()));

3.b) The last step then, is to draw some words to the screen.  We'll grab a new word every 15 frames, set the fill color to white (also with some amount of transparency), scale the font by a random amount, and draw the word to a random location in the window. 

    int numFrames = getElapsedFrames();
    if(numFrames%15==0)
    {
        if(words.size()>0)
        {
            int i = numFrames%words.size();

            gl::color(1, 1, 1, Rand::randFloat(0.25f, 0.75f));
            fontOpts.scale(Rand::randFloat(0.3f, 3.0f));
            font->drawString(words[i],
                Vec2f(Rand::randFloat(getWindowWidth()),
                    Rand::randFloat(getWindowHeight())),
                fontOpts );
        }
    }
}

At this point, we should be able to build/run the project and hopefully see something similar to this:


If something has gone horribly awry, send me an e-mail or hit me up on github.  I've put the project up on github as well, but be advised you may have to change some of the project settings to reflect your own build environment.  For the scope of my project, I've got quite a bit more twitter to learn, including how to manage tweets, maybe how to deal with the streaming API, and a few other things, but that's all down the road.  Next up:

Wednesday, January 16, 2013

building twitcurl in visual studio 2010

UPDATE 20130122.1330: Verified this build chain does let you query twitter from Cinder, that being the goal.  Yeah, yeah, i should've tested that too;P  I don't have a really fun tutorial yet, just printing to the app::console(), but yeah, it works, so go forth and...uhh...twinderifiy?

    If you're wondering where the next round of C4CNC is, fear not, the manuscript is actually done and waiting to get some design and formatting love.  I wasn't kidding when I said this is probably a bad time to embark on a project that required some time and attention, but I'm committed to delivering on that.  Just got back from a great weekend of openFrameworkshops with Reza Ali and Josh Nimoy at GAFFTA, so i'm...not charged, but definitely refreshed and ready to keep cranking on creative coding related work, and especially C++ work.  I've really been dragging my feet on C++, but this year we're doing it live.  Seriously, my brain is so full of things i want to explore, prototype, visualize, maaaan...


    To that end, it's time to get cracking on an installation for GDC, my favorite time of year. Hopefully since I'm getting started sooner on this than I did for my ill-fated CES installation attempts, this one will go all the way. We've decided to do a twitter visualizer, and since I've decided that this year I'd like to do much more work in C++, I'm going with Cinder (of course).

    The first bump-in-the-road I came across is the lack of any official C++ support for twitter, but there are a few different twitter c++ libraries that have been written by various external parties. I've settled on twitcurl because it seems like the lightest, most straightforward version. The current download doesn't support Visual Studio 2010 though, which means the whole dependency chain needs to be rebuilt. It's not a terribly hard process, but there aren't a ton of good directions on the website, and in fact I got more out of the directions for building and using libcurl. I'm going to try and present a condensed version here, mainly for my own reference if I have to do this again, but also for anyone else trying to get up and running with C++/twitter in short order.


    I'm going to assume you've got some experience setting up Visual Studio projects, so I'm not going to go too deep into the specifics of that. First up, we need to grab the source distros:

openssl - Download (1.0.1c is latest as of this writing)
libssh2 - Download (1.4.3 is latest as of this writing)
libcURL - Download (7.28.1 is latest as of this writing)
twitcurl - Checkout SVN

    Now before we get down to business, I'm going to recommend a little bit of housekeeping.  These projects are all rather noisy, i.e. there are a lot of folders, a lot of files, solutions, workspaces, and support files for different IDEs, and...well you get the idea.  This may be 101 for some folks, but it's worth jotting down.  I've set my folder structure up so, feel free to adopt this or something similar (or ignore completely):

CPP/
  libs/
    src/
      curl-7.28.1/
      libssh2-1.4.3/
      libtwitcurl/
      openssl-1.0.1c/
    build/
      libcurl/
        include/
        lib/
          Debug/
          Release/
      libssh2/
        include/
        lib/
          Debug/
          Release/
      libtwitcurl/
        include/
            curl/
        lib/
          Debug/
          Release/
      openssl/

    Again, this is really just a suggestion based on how i store all my libraries on my machine, it's just for convenience.  That all in place, let's get to building some dependencies.

    All the directions are taken from the following document, which I HIGHLY recommend reading.  There are some really important points here that make all the difference between odd linker errors and not.

openssl


1) Install Perl.  I used ActivePerl, but any distribution should be sufficient, really you just need it to run some build configuration scripts.  The doc also recommends using NASM, but I haven't seen any disadvantage of not using it.  That said, I can't really comment, because I haven't seen the advantages of using it either.

2) Open a Visual Studio command line and switch over to your openssl source root directory. You may need to add perl to your path, which you can do by issuing the command:

path=%PATH%;<your perl executable folder>

3) Now we can configure and kick off our build. Issue the following commands (there'll be a pause in between as the scripts run):

perl Configure VC-WIN32 --prefix=<your openssl build path's root>
ms\do_ms
nmake -f ms\nt.mak
nmake -f ms\nt.mak test
nmake -f ms\nt.mak install

<your openssl build path's root> should be just that, the root folder of your desired openssl build with forward slashes.  In fact, if you jump back up and look at how I've laid out my folder, you'll see I have no folders under my openssl folder by design.  This is because the openssl build process creates include, lib, and a few other folders for you.  Also, pay close attention to the output of the test step, you shouldn't see any errors, but if you do, retrace your steps and try the build again.

From here on out, it's all in Visual Studio, so let's get the rest of our libraries built. So long, command line environment!

libssh2


1) Open the Visual Studio project, located at <your libssh2 source root>\win32\libssh2.dsp and take the project through the Visual Studio 2010 conversion process.

2) Now we need to configure the LIB Debug build configuration.  We need to add openssl as a dependency, so first, add the path to the openssl include folder to the C/C++ > General > Additional Include Directories.

3) We also need to set the C/C++ > Code Generation > Runtime Library option to Multi-threaded Debug (MTd).  This is easily the most important step in the whole process, every other project will need to have this set, or you'll get some weird linker errors.

4) Next, we need to add the openssl libraries to our linker dependencies.  Add libeay32.lib and ssleay32.lib to the Librarian > General > Additional Dependencies field; Be sure to also add <your openssl build root>\lib to the Librarian > General > Additional Library Directories field.

5) The last bit of configuration is to set the Librarian > General > Output File field to wherever you'd like the final lib file to end up.  In my case, the value is lib\build\libssh2\lib\Debug\libssh2.lib.  Be sure to configure the LIB Release configuration as well. The steps are all the same, save the output file settings.

6) Build the project and ignore the LNK4221 warnings, they won't affect anything here.

Whew!  Halfway done, now comes the main event, libcurl.  Twitcurl and any projects you build with twitcurl depend on this, so let's plow through and get tweeting from C++ (and Cinder (or ofx, or whatever your C++ framework of choice be)).


bro::comeAt(&me);

libcurl


1) For libcurl, we need to setup libssh2 as a dependency, so open the Visual Studio project <your curl source root>\lib\libcurl.vcproj and add the include path, the library, and the library path for your libssh2 build to the appropriate fields.

2) Remember to also set the C/C++ > Code Generation > Runtime Library to Multi-Threaded Debug (MTd) and stay odd linker error free!

3) libcurl requires a few preprocessor definitions.  To set these up, open the C/C++ > Preprocessor > Preprocessor Definitions window and copy-paste the following block below the existing definitions:

CURL_STATICLIB
USE_LIBSSH2
CURL_DISABLE_LDAP
HAVE_LIBSSH2
HAVE_LIBSSH2_H
LIBSSH2_WIN32
LIBSSH2_LIBRARY

4) If you've setup a custom folder structure, remember also to set your output file settings to wherever you'd like libcurl to sit after it gets built.

5) Hit build and you should be good to go.  All that's left now is to build twitcurl and you'll (we'll, i'll) be tweeting in style, because C++ never goes out of style.  Weird style fads and convoluted paradigms might, but that's a whole other conversation.

twitcurl


The twitcurl project page and wiki are a little odd and convoluted, so I would say those may not the best places to go for information on the project.  Probably a good idea to just checkout the source and make like Kenobi talking to storm troopers talking to Kenobi...(yo, dawg)


1) We'll need to do a little more housekeeping, this time with the twitcurl source.  In the <your twitcurl source root>\libtwitcurl folder, you'll see two subfolders, curl and lib. These folders contain the libcurl dependencies for twitcurl, but as we mentioned earlier, these are out of date.  At this point, we can take a few different approaches.  The end goal is to replace the existing libcurl dependencies with the ones we built previously, so we can replace the contents of the curl and lib folders with the contents from our libcurl build, or we can ignore these and change the project configurations. I chose to change the project configurations so I wouldn't have duplicates floating around.  Ultimately, we're going to need to change some configuration settings anyway, so I'm not sure there's much value in keeping the old dependencies around.

2) Once we've got a plan of action (keep,delete,etc), let's pop open libtwitcurl/twitcurl.sln in Visual Studio and replace all the references to curl with the paths to our previously built libcurl.  We need to update a few fields with the relevant info:

C/C++ > General > Additional Include Directories
Librarian > General > Additional Dependencies
Librarian > General > Additional Library Directories
Librarian > General > Output File (optional)
Librarian > General > Additional Dependencies (also add ws2_32.lib to this field)

3) Next, let's not forget to set the C/C++ > Code Generation > Runtime Library to...Yep, Multi-threaded Debug (MTd).

4) Lastly, let's add CURL_STATICLIB to C/C++ > Preprocessor > Preprocessor Definitions and build the project. If everything's setup correctly and all your previous builds of the dependency chain succeeded, congrats!  You now have everything you need to send tweets in C++.  Take a moment and be awesome (or keep being awesome if you already are)!


    So now it's pretty much just using twitcurl in a project.  Building the included twitterClient is pretty simple, we just need to:

1) Add our builds of libtwitcurl and libcurl as dependencies
2) Add ws2_32.lib as a dependency
3) Add the CURL_STATICLIB Preprocessor Definition
4) Set the C/C++ > Code Generation > Runtime Library option to...whaaaat?
5) Build that muthah (out).  We'll need to change some of the URLs in the project, but otherwise it should be a straight ahead process.

    Step one down, and trust me when I say this is monumental.  If I learned anything from this process it's RTFM!!!  TWICE!!!!  I had the hardest time getting things to build because I glossed over a step here and there and didn't read all the little details about what settings needed to be which specifically.  But that's all behind us now, so next we need to get tweeting from Cinder.  For the next segment, I'll probably recreate Jer Thorp's twitter and processing tutorial in Cinder just to get up and running.  Stay Tuned!

Saturday, December 29, 2012

C4CNC101 - Section 1: Intro To Functions

DISCLAIMER:
(1) If you are already familiar with functions, variables, types, otherwise coding basics, C4CNC101 is not for you.  I'd recommend taking a look at something like The Nature Of Code if you're interested in getting up and running with processing.
(2) A familiarity with digital art in general, including coordinate systems, pixels, etc will be extremely helpful.  If you've ever used Photoshop, Illustrator, or any other digital art program, 2d or 3d, you should be good to go.
(3) If you're a programmer, you'll probably find tons of inconsistencies or things i'm glossing over.  My goal here is not to teach programming, it's more to get people who want to get into using code as a tool to create or augment the creation of art up and running, enough to give them the foundation knowledge to research deeper if they so choose.  I've done alot of thinking about this and I believe the information as I've presented it is true in spirit and in the scope of processing.

header
    Ok, so hopefully by now you've downloaded and installed processing, signed up for an OpenProcessing account, and joined the C4CNC Classroom on OpenProcessing.  The first step is really the only requirement, but i do recommend at least peeking around OpenProcessing to get an idea of what's possible.  I'll warn you in advance that if you're just starting out, it can be pretty easy to get overwhelmed by the breadth and depth of content therein, but fear not!  Hopefully by the time we're through these first five lessons, you'll know enough to read through some of the sketches and even build your own sketches based off of them.  As I mentioned in the last post, if you come across any sketches or effects you'd like to remix, breakdown, or dive into deeper, let me know and I'll work something out for a future set of tutorials.  Alright, so let's begin!

    First, let's conceptualize a computer program as nothing more than a set of commands or instructions that processes information and produces results based on the specifics of the information and the commands.  While that's a bit of an oversimplification, on some level this holds true for any program, from the small visualization sketches we'll be writing here, all the way up to full on operating systems like Windows or Linux.  We call these instructions functions and we call the information data.  So let's write our first program.  Open processing and type the following function:

ellipse(50, 50, 50, 50);

    Once that's in place, press the Run button (it looks like a 'Play' button) in the upper left hand corner.  Alternately, you can check out the sketch on OpenProcessing(1-1: Basic Functions), although I highly recommend you follow along by typing the code yourself to get the most out of these lessons.  Either way, you should see something like the following:

Step1_0

CODERSPEAK: When we issue a command in a program, we say we are calling the function or making a function call, and when we provide data to a function, we say we are passing an argument (or arguments).  So when we issue a command and give it some information, we are calling a function with arguments.

    This may not look like much, but it's actually a valid processing sketch, so congrats.  In some languages, Python for example, a single function like this could also comprise a valid and complete program, so not bad for a first step!  Sure, it's not very exciting and doesn't do much, but we'll get there.

    Now, let's take a moment and break down our function call.  For our intents and purposes, every function call will be a name followed by a set of parentheses.  If we're passing arguments to the function, they'll be between the parentheses, separated by commas.  And finally, we end our function call with a semicolon, so processing knows to move on to the next function.  Thus, the skeleton for any function call is:

functionName(argument1, argument2, argument3, etc);

    Recall that we started out by defining a program as a set of commands(functions) that processes information(data) to produce a result.  Arguments are how we provide the data to a function.  In cases where we're passing multiple arguments, each argument is used by the function to perform a specific task along the way to producing the final result.  So in the case of our first sketch here, as the programmer we're telling processing to:

Draw an ellipse with a position of 50 pixels along the x-axis and 50 pixels along the y-axis, and a size of 50 pixels along the x-axis and 50 pixels along the y-axis.

    Most, if not all, publicly available coding tools and environments have references that describe (some in more detail than others) what each argument does.  For example, take a look at the reference page for the ellipse() function, which not only details the arguments, but also provides some useful tips on calling ellipse().

    Alright, so let's practice a bit by adding a few more functions.  Add another function before the ellipse() call, so your sketch contains the following function calls.  Note that we're changing some of the arguments to the ellipse() call, and you should feel free to change any of the arguments to any of the functions.  Experimentation is a key to learning!

size(400, 400);
ellipse(200, 200, 50, 50);

    As you can probably tell from the result, the size() function sets the size in pixels of our sketch's window.  Even though both functions take a different number of arguments and produce markedly different results, you can see that they both follow the same skeleton we outlined above, i.e.:

functionName(argument1, argument2, argument3, etc);

    Before we get a little more advanced, let's add a few more basic processing functions, again for practice, and also to see how we can affect what we're drawing on-screen so we can start getting an idea of the kind of drawing functionality that processing makes available to our sketches.  We're going to add three more function calls in-between our size() call and our ellipse() call: background(), stroke(), and fill().  Type these functions in as presented below:

size(400, 400);
background(0, 0, 0);
stroke(255, 255, 255);
fill(0, 128, 255);
ellipse(200, 200, 100, 100);

    As the saying goes, the more things change, the more things stay the same.  As we add functions, we see the results compound and the output become more complex, but in the end, all functions are called in the same manner using the same syntax.  Feeling comfortable typing in functions?  Then give the following exercises a try and see what you come up with.  Questions?  Please post them in the comments!

footer
EXERCISE 1: Draw 5 different ellipses with different radii and in different locations.  Be sure to check out the Processing Language Reference for ellipse() for more details on how the ellipse() function works.  Try changing some of the arguments to the other functions as well!
Exercise 1-1

EXERCISE 2: Take a look at the Language Reference for background(), stroke(), and fill().  Now, take the previous exercise and change the stroke and fill color for each ellipse. While you're at it, change the background color to something a bit friendlier than black, it's getting a bit gloomy in here...
Exercise 1-2

CODERSPEAK: You might be wondering how processing knows what to do when we call any of the functions presented here.  Well, most, if not all programming languages and environments come with a set of pre-existing functions and data that we use to build up our programs initially, which you'll often hear referred to as built-ins or library functions.  When writing programs, you'll use a combination of both built-in functions and data, as well as functions and data you define yourself.  We'll discuss this process in the next couple lessons.


PREVIOUS ARTICLES
Foreword
Project Preview